A properly earthed electrical system is invisible when it’s working and catastrophic when it isn’t. Earthing — connecting electrical installations to the ground — provides the safety path that trips circuit breakers during a fault and prevents electrical current from passing through a person instead. Most households and offices never check their earthing until something goes wrong. A multimeter check takes under five minutes and gives you a clear answer about whether your earthing is functional.
Understanding Earthing and Why It Needs Checking
In a standard electrical socket — whether in India or most other countries — there are three connections: Phase (Live), Neutral, and Earth. The phase carries current to the appliance. The neutral completes the circuit back to the supply. The earth wire connects the metal casing of the appliance and the socket to the ground electrode buried in the earth outside.
Under normal operation, no current flows through the earth wire. But if a fault occurs — say, a live wire contacts the metal body of an appliance — the earth wire provides a low-resistance path for that fault current to flow safely to ground, triggering the circuit breaker. Without proper earthing, that fault current flows through whoever touches the appliance instead.
Over time, earthing connections corrode, earth rods deteriorate, and wiring joints loosen. A connection that worked five years ago may be inadequate today.
What You Need
- A digital multimeter
- Insulated test probes in good condition
- Safety gloves and eye protection
- Basic knowledge of which socket holes are Phase, Neutral, and Earth
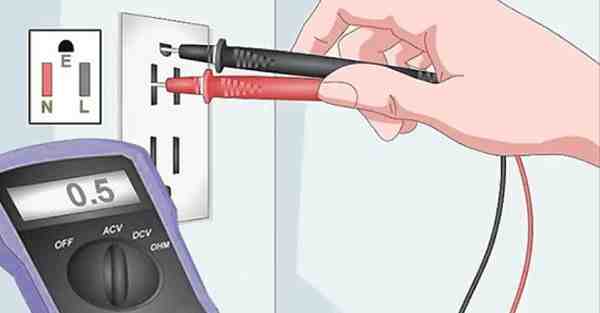
In a standard Indian three-pin socket: the top hole is Earth, the bottom-right hole is Phase (Live), and the bottom-left hole is Neutral.
Method 1: Voltage Test — Checking Earthing at the Socket
This is the most practical method for checking whether earthing is present and functional at a wall socket, without any external equipment beyond a multimeter.
Step 1: Set your multimeter to AC voltage mode at a range above 250V (for standard Indian 230V supply).
Step 2: Insert the red probe into the Phase hole and the black probe into the Neutral hole. Note this reading — it should be approximately 220–240V AC. This confirms the supply is live.
Step 3: Keep the red probe in the Phase hole. Move the black probe to the Earth hole.
Step 4: Read the voltage. A properly earthed socket shows a reading close to or equal to the Phase-Neutral voltage — approximately 220–240V.
Interpreting the result: If the Phase-to-Earth voltage is close to the Phase-to-Neutral voltage, earthing is present and connected. If the Phase-to-Earth reading is significantly lower — say, 50V or 80V where the Phase-to-Neutral reads 230V — the earth connection is weak or has high resistance. If the Phase-to-Earth reading is near zero, there is no effective earthing at that socket.
Method 2: Resistance Test — Checking Earth Connection Quality
The voltage test confirms whether earth is present. The resistance test measures the quality of that earth connection — how well it actually conducts fault current to ground.
Step 1: Ensure power to the circuit is completely off before this test.
Step 2: Set the multimeter to resistance mode (Ω) at the lowest available range.
Step 3: Connect one probe to the earth terminal in the socket and the other probe to a known good earth reference — such as the main earth terminal on your distribution board, a metal water pipe entering the building from underground, or a metal conduit connected to the earthing system.
Step 4: Read the resistance displayed.
Interpreting the result: A resistance value below 5 ohms indicates a good, low-resistance earth path — fault current will flow easily to ground. Values between 5 and 25 ohms suggest marginal earthing that may not respond reliably during a serious fault. Values above 25 ohms indicate poor earthing that needs investigation by a qualified electrician. A reading of infinity (OL) means the earth connection is broken entirely.
Neutral-to-Earth Voltage Check
A supplementary check that reveals poor earthing and wiring issues. Set the multimeter to AC voltage mode and measure voltage between the Neutral and Earth holes in the socket. In a well-earthed, properly wired circuit, this reading should be below 5 volts — ideally less than 2 volts. A higher reading suggests either a poor earth connection or current flowing through the neutral due to load imbalance.
When to Call a Professional
A multimeter gives you a reliable assessment of whether earthing is present and roughly how good it is. It cannot replace a proper earth resistance test using a dedicated earth tester, which drives a test current through the earth electrode to measure true ground resistance according to electrical standards. If your voltage test shows weak or absent earthing, or your resistance reading is above 5 ohms, contact a qualified electrician before using high-power appliances on that circuit.
FAQs
Q: What voltage should I see between Phase and Earth in a properly earthed socket?
A: Approximately 220–240V — close to the same voltage as Phase-to-Neutral. A significantly lower reading indicates weak or absent earthing.
Q: What resistance value confirms good earthing?
A: Below 5 ohms indicates a solid earth connection. Above 25 ohms indicates poor earthing that needs professional attention.
Q: Can I check earthing with the power on?
A: The voltage test requires power to be on. The resistance test must be done with power completely off to avoid damaging the multimeter and for personal safety.
Q: What happens if there is no earthing in my home?
A: Without earthing, a fault in any appliance can energise its metal casing. Anyone touching it becomes the path for current to flow to ground, resulting in a potentially fatal electric shock.
Q: Is a multimeter check enough to certify my earthing is safe?
A: No. A multimeter check is a useful quick test for presence and basic quality. A certified electrician with a proper earth resistance tester is needed for installation certification or compliance verification.